Why It's Called "Eyelet" (aka Read the Directions, Dummy!)
But I did! I swear I did! Five times! Yet, my Leslie's Double Eyelet Socks are NOT coming out right. The one and a half inches of K2P2 rib is fine. It's everything after that that's wrong.This is the sock (photo borrowed from Mountain Colors' website:

Pattern: Leslie's Double Eyelet Socks (Mountain Colors)
Yarn: Mountain Colors Weaver's Quarters
Color: Wild Flower
Needles: #1.5 Crystal Palace DPNs
Started: 11/30/06
New Skills: Lace pattern and the tiniest needles yet
Measurements: It's a sock
Modification: None on purpose
Notes: Read on, my friends...
This is the blurb about the sock from Mountain Colors' website:
Leslie's Double Eyelet Socks
This sock has a lace stitch that is so easy to remember! You can lay your knitting down in the middle of a row and still find your place again later. Uses 1 skein Weaver's Wool Quarters. Design by Leslie Taylor.
The pattern is the "Double Eyelet Rib" from The Harmony Guides 450 Knitting Stitches, Volume 2 (according to the directions). This is what it says to do after the K2P2 rib is done (the pattern stitch begins):
At beginning of next round dec 1 st to 63 sts and AT THE SAME TIME begin pattern stitch above. Continue in pattern yadda yadda yadda...
OK. Started out with 64 sts, did the ribbing, now I've decreased by one st at the beginning of my all-new pattern round. I'm also supposed to start the pattern, which is a 7-stitch repeat and consists of several rows of K5 P2 with a pattern row in between. The instructions say:
*K2tog, yf, K1, yf, sl 1, K1, psso, P2*
OK. The first time I did it, I misread it and accidentally added an extra K1. I did
*K2tog, yf, K1, yf, K1, sl 1, K1, psso, P2*
Whoops. Well, no wonder my purls aren't aligning.
If done correctly, I assume, everything from K2tog through PSSO should sit over the five knit stitches, and the two purls should align. Right? Seems that way from the photo. That's why it's a double eyelet RIB.
Frogged back to the beginning of the pattern. Complete PITA, dark yarn (see below) on #1.5's at night in poor lighting with a pile of cats who felt utterly compelled to help me. Re-read the pattern. OH. "yf, K1, yf SLIP".
Try again.
STILL not working. Count stitches. Not sure about that yf thing. Is that the same as YO? (Can you tell this is my first experience with lace of any sort? And possibly my last?) Drag out the Vogue book... one of the yarn overs sounds like what I'm supposed to be doing. I try it. Doesn't look "right". Frog back a bit. Re-read Vogue. Re-read pattern. Decide maybe it's one of those "trust me, it'll look right in the end" deals and follow the pattern.
OK... I'm back to K5 P2. And NOTHING IS LINING UP!!! My K5s are straddling P2's and my P2's are landing wherever they want to. AGGGGH! I think it's called "eyelet" because that's all you're left with once you've gouged them out (your eyes) trying to get it to work.
Again, I count my stitches.
67?!? How the frickenfrack did I wind up with four extra stitches?!?!?
OK all you lace-wise peeps. Tell me what I'm doing wrong. It's a mistake to give a knitter sticks with sharp points on both ends when they're first learning lace. Maybe lace should be learned on blunt objects.
On a more positive note, I've already made serious progress on the Celtic Knot Scarf.
Pattern: Otter Originals Celtic Knot Scarf
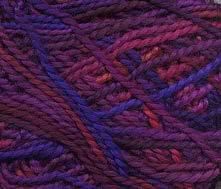
Yarn: Plymouth Encore (75% Acrylic, 25% Wool)
Color: Purple with little flecks of blue and red
Needles: #8 Crystal Palace DPNs and Straights
Started: 12/05/06
New Skills: I-cord
Measurements: Not sure yet, length is left up to knitter's discretion
Modification: Needles used
Notes: Pattern calls for circulars and stitch holders. I opted to knit the bulk on straights and use DPNs for the I-cord like EZ does--much simpler than loading the knit sts back onto the left needle 4,000 times, plus the DPN acts as a stitch holder.
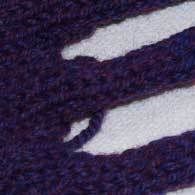
I finished the first set of "fingers" tonight. I'll keep knitting normally in pattern (stockinette with a 3-stitch garter border) for 20 inches or so, then repeat the fingers. That's where it will get interesting. The fingers of I-cord get woven/braided and THAT is what forms the Celtic Knot! It's permanently secured as if you're wearing it pinned that way. How cool is that? Thus the "knitter's discretion" on length. It's a "try on as you go" project. I'm enjoying it. Easy pattern but the end result will look SO complicated!
Always best to end on a good note, eh?
posted by Jeanne @ 4:12 AM
![]()
![]()


3 Comments:
Let me see if I can help. You said your instructions for the pattern row are:
*K2tog, yf, K1, yf, sl 1, K1, psso, P2*
First you K2tog, then you bring the yarn forward between the needles, then "K1." What this does is creates, in essence, a "yarn over." Then you bring the yarn forward between the needles again (or, a yarnover), slip 1 stitch, K1, PSSO, then P2.
K2tog = 1st stitch
YF - 2nd stitch
K1 - 3rd stitch
YF - 4th stitch
Sl1, K1, PSSO - 5th stitch
P2 - 6th, 7th stitches
Thanks, Colleen. That's what I thought. So YF is pretty much the same as YO. (Why don't they just write YO?)
I probably didn't PSSO or K2tog somewhere. The cats, they were like a swarm of flies while I was trying to knit and count. Probably caused me to lose my place.
Hello! I love the celtic braid you are making, the problem that I have is that I have search all internet looking where this pattern is sold and I can`t find it! please, where this pattern is located?
Thank you!
Post a Comment
<< Home